2D에서 3D로 프로젝트 파일을 만들면 차이점이 하이어라키 창에 MainCamera 대신 Directional Light라는 오브젝트가 있는 것이다. Light 소스는 특정한 위치와 방향으로 오브젝트에 빛을 쏴주는 역할을 하며 여러가지 유형이 있다. 연산이 비싸고 성능에 밀접한 영향을 끼치기 때문에 적당히 사용하는 것이 좋다.


준비된 프리팹을 불러오고 SkyBox 용도로 사용할 Material을 만든다.

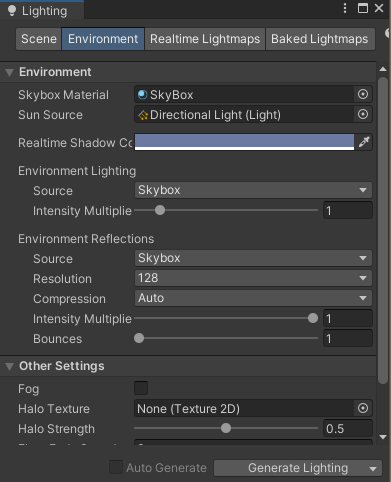
SkyBox는 게임 배경을 둘러싸는 환경 매핑 기술로, 유니티에서 씬 배경으로 사용된다. 낮과 밤 등 시간대에 맞게 변화시킬 수 있고 주로 하늘, 구름, 산 등의 자연 배경을 표현하는데 사용되며, 보통 박스나 구 형태이다.


유니티 우측 하단에 Auto Generate Lighting Off를 누른다. (Window - Rendering - Lighting을 눌러도 된다.)


Enviroment에서 Default 값으로 되어있는 Skybox에 방금 만든 SkyBox를 넣어준다.


플레이어 만들기

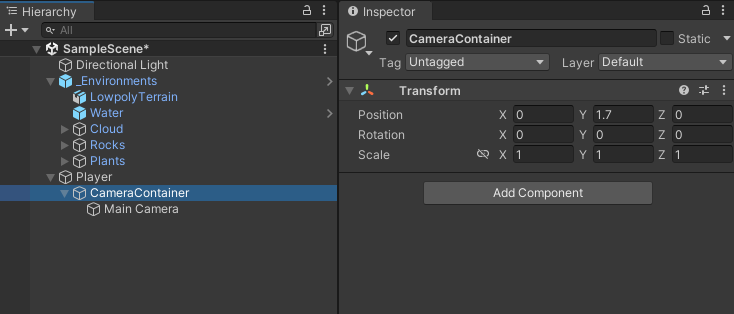
기본 오브젝트를 생성하여 플레이어를 만들고 하위에 눈(시야) 역할을 할 오브젝트를 추가한다. Main Camera를 하위에 넣어 좌표를 플레이어에게 고정시킨다.


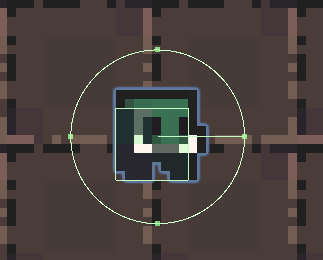
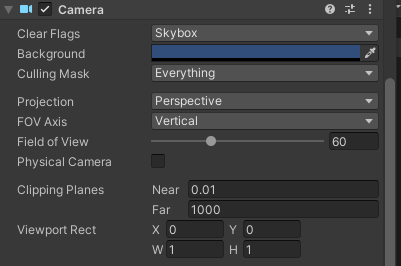
어디부터 어디까지 보일 것인지 Main Camera의 시야 절도체를 조절한다.


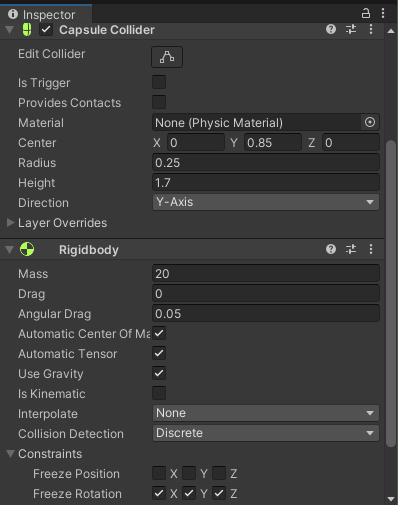
플레이어에 Capsule Colider와 Rigidbody를 달아준다. Rigidbody의 질량(Mass)는 20 정도로 너무 가볍지 않게 주고 Freeze Rotation의 X, Y, Z축을 물리적인 회전을 하지 않게 켜준다.


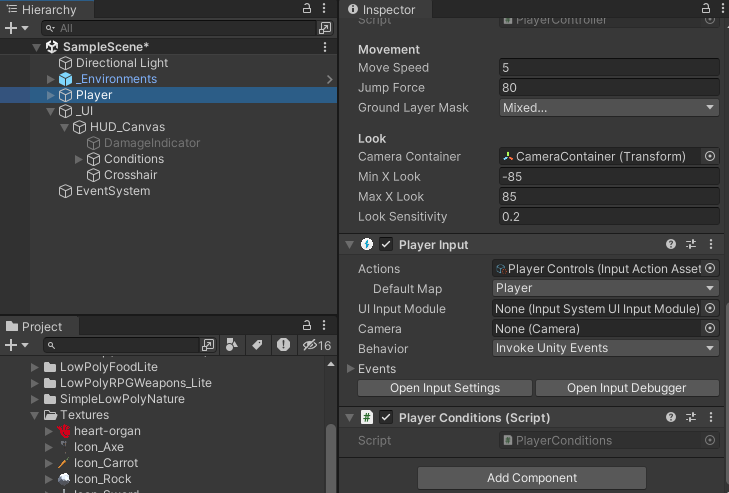
Player의 태그를 Player로, 레이어에 Player를 추가하여 바꿔주고, Input System 패키지를 받아 플레이어의 Input Actions를 추가하여 필요한 값들을 설정한다.


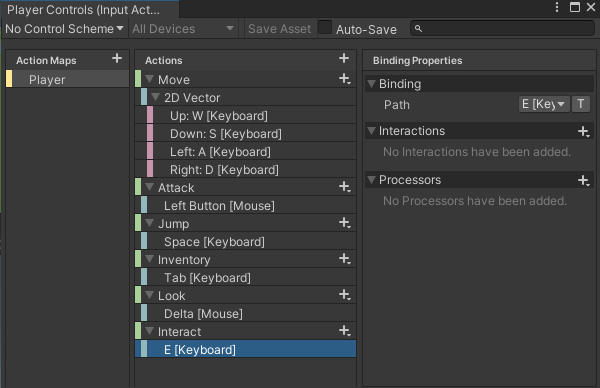
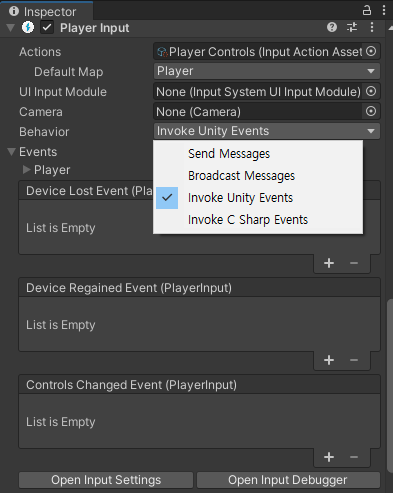
Player 오브젝트에 Player Input을 추가하고 방금 만든 Input Actions를 넣어준다.


저번 2D 개발 글에서는 onMove, onAttack, onJump 등 SendMessage 상태로 바로 호출하여 사용하는 방식을 사용했다. 이번에는 Event를 이용해볼 것이다. Behavior를 Invoke Unity Events로 바꾼다. Invoke Unity Events는 Delegate의 종류 중 하나인데 유니티에서 사용하기에 더 특화되어 있다.


Player를 컨트롤하기 위한 스크립트를 만들어 연결한다.

마우스를 돌리면 카메라 시야를 돌릴 수 있게 하고 땅에 닿았을 때만 점프하도록 제한을 둔다.

[Header("Movement")]
public float moveSpeed;
private Vector2 curMovementInput;
public float jumpForce;
public LayerMask groundLayerMask;

[Header("Look")]
public Transform cameraContainer;
public float minXLook;
public float maxXLook;
private float camCurXRot;
public float lookSensitivity;

private Vector2 mouseDelta;

[HideInInspector]
public bool canLook = true;

private Rigidbody _rigidbody;

public static PlayerController instance;
private void Awake()
{
    instance = this;
    _rigidbody = GetComponent<Rigidbody>();
}

void Start()
{
	// 커서 안보이게
    Cursor.lockState = CursorLockMode.Locked;
}

private void FixedUpdate()
{
    Move();
}

private void LateUpdate()
{
    if (canLook)
    {
        CameraLook();
    }
}

private void Move()
{
    Vector3 dir = transform.forward * curMovementInput.y + transform.right * curMovementInput.x;
    dir *= moveSpeed;
    dir.y = _rigidbody.velocity.y;

    _rigidbody.velocity = dir;
}

// 카메라를 마우스로 볼 수 있게하는 코드
void CameraLook()
{
    camCurXRot += mouseDelta.y * lookSensitivity;
    camCurXRot = Mathf.Clamp(camCurXRot, minXLook, maxXLook);
    cameraContainer.localEulerAngles = new Vector3(-camCurXRot, 0, 0);

    transform.eulerAngles += new Vector3(0, mouseDelta.x * lookSensitivity, 0);
}

public void OnLookInput(InputAction.CallbackContext context)
{
    mouseDelta = context.ReadValue<Vector2>();
}

public void OnMoveInput(InputAction.CallbackContext context)
{
    if (context.phase == InputActionPhase.Performed)
    {
        curMovementInput = context.ReadValue<Vector2>();
    }
    else if (context.phase == InputActionPhase.Canceled)
    {
        curMovementInput = Vector2.zero;
    }
}

public void OnJumpInput(InputAction.CallbackContext context)
{
    if (context.phase == InputActionPhase.Started)
    {
        if (IsGrounded())
            _rigidbody.AddForce(Vector2.up * jumpForce, ForceMode.Impulse);

    }
}

// 땅을 밟고 있을 때만 점프
private bool IsGrounded()
{
    Ray[] rays = new Ray[4]
    {
        new Ray(transform.position + (transform.forward * 0.2f) + (Vector3.up * 0.01f) , Vector3.down),
        new Ray(transform.position + (-transform.forward * 0.2f)+ (Vector3.up * 0.01f), Vector3.down),
        new Ray(transform.position + (transform.right * 0.2f) + (Vector3.up * 0.01f), Vector3.down),
        new Ray(transform.position + (-transform.right * 0.2f) + (Vector3.up * 0.01f), Vector3.down),
    };

    for (int i = 0; i < rays.Length; i++)
    {
        if (Physics.Raycast(rays[i], 0.1f, groundLayerMask))
        {
            return true;
        }
    }

    return false;
}

private void OnDrawGizmos()
{
    Gizmos.color = Color.red;
    Gizmos.DrawRay(transform.position + (transform.forward * 0.2f), Vector3.down);
    Gizmos.DrawRay(transform.position + (-transform.forward * 0.2f), Vector3.down);
    Gizmos.DrawRay(transform.position + (transform.right * 0.2f), Vector3.down);
    Gizmos.DrawRay(transform.position + (-transform.right * 0.2f), Vector3.down);
}

public void ToggleCursor(bool toggle)
{
    Cursor.lockState = toggle ? CursorLockMode.None : CursorLockMode.Locked;
    canLook = !toggle;
}


플레이어 상태 및 UI

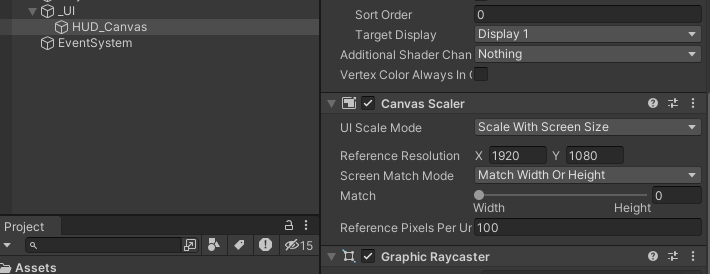
UI를 만들기 위해 빈 오브젝트를 만든다.

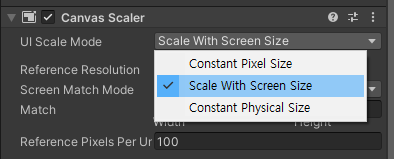
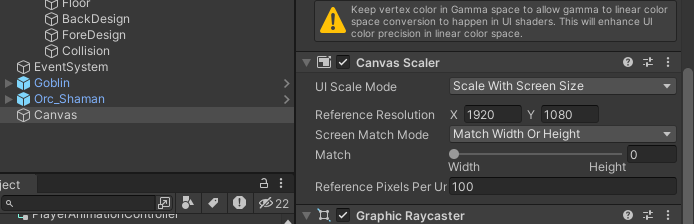
하단에 Canvas를 추가하고 해상도를 설정해준다.


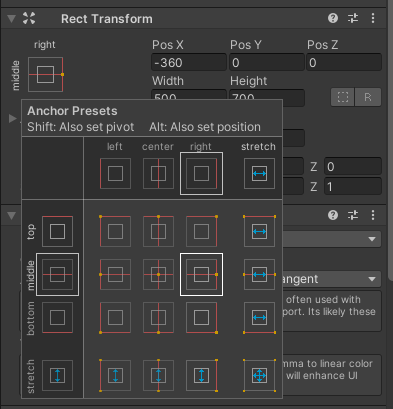
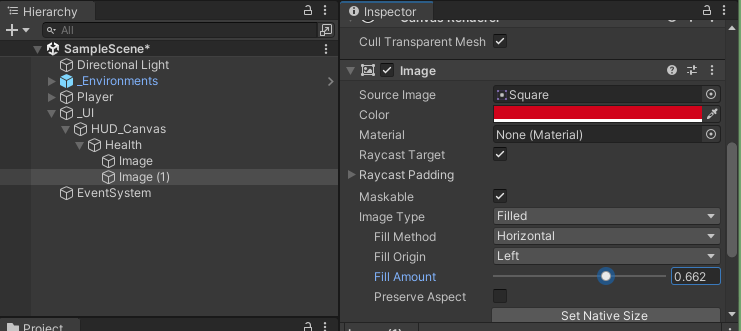
HP 표시를 위해 Image들을 추가해준다.


이번엔 Slider가 아닌 Sprite로 HP를 표시해볼 것이기 때문에 Package Manager에서 2D Sprite를 설치한다.

Asset에 폴더를 만들고 그 안에 자유롭게 자르거나 늘리는 등 수정할 Sprite - Square를 만들어준다. Health 캔버스 아래 이미지 오브젝트를 하나 더 생성하고 Square를 넣어준 뒤, Image TypeFiled로 바꾼다. Sliced는 이미지를 잘라서 늘렸을 때, 늘어나야하는 방향을 설정해줘서 이미지가 깨지지 않게 한다. Tiled는 바둑 방식, Filed는 채울 때 사용한다.


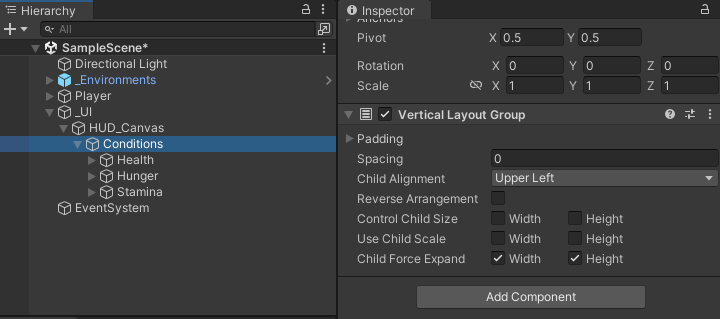
빈 오브젝트를 추가하여 Vertical Layout Group으로 Health를 포함한 상태들을 묶어준다.


화면 중앙에 Image 두 개를 추가하여 Crosshair와 DamageIndicator을 만든다. DamageIndicator는 데미지를 입었을 때만 켜지도록 꺼두고 Player에 플레이어의 상태를 관리해줄 스크립트를 추가한다.


public으로 Max값, 시작값, 회복률, 감소율 등을 추가하고, [HideInInspector]로 Inspector창에서 수정할 수 없게 한다.

상태들을 불러오고 배고픔이 다 닳았을 때는 데미지가 감소하도록, 데미지를 받았을 때 처리할 이벤트를 받기 위해 UnityEvent [System.Serializable]로 플레이어의 상태들을 Inspector창에 노출시키고 상태 bar들을 넣어준다.

ublic interface IDamagable
{
    void TakePhysicalDamage(int damageAmount);
}

[System.Serializable]
public class Condition
{
    [HideInInspector]
    public float curValue;
    public float maxValue;
    public float startValue;
    public float regenRate;
    public float decayRate;
    public Image uiBar;

    public void Add(float amount)
    {
        curValue = Mathf.Min(curValue+ amount, maxValue);
    }

    public void Subtract(float amount) 
    {
        curValue = Mathf.Max(curValue - amount, 0.0f);
    }

    public float GetPercentage()
    {
        return curValue / maxValue;
    }

}

public class PlayerConditions : MonoBehaviour, IDamagable
{
    public Condition health;
    public Condition hunger;
    public Condition stamina;

    public float noHungerHealthDecay;

    public UnityEvent onTakeDamage;

    void Start()
    {
        health.curValue = health.startValue;
        hunger.curValue = hunger.startValue;
        stamina.curValue = stamina.startValue;
    }

    // Update is called once per frame
    void Update()
    {
        hunger.Subtract(hunger.decayRate * Time.deltaTime);
        stamina.Add(stamina.regenRate * Time.deltaTime);

        if(hunger.curValue == 0.0f)
            health.Subtract(noHungerHealthDecay * Time.deltaTime);

        if (health.curValue == 0.0f)
            Die();

        health.uiBar.fillAmount = health.GetPercentage();
        hunger.uiBar.fillAmount = hunger.GetPercentage();
        stamina.uiBar.fillAmount = stamina.GetPercentage();
    }

    public void Heal(float amount)
    {
        health.Add(amount);
    }

    public void Eat(float amount)
    {
        hunger.Add(amount);
    }

    public bool UseStamina(float amount)
    {
        if (stamina.curValue - amount < 0)
            return false;

        stamina.Subtract(amount);
        return true;
    }

    public void Die()
    {
        Debug.Log("플레이어가 죽었다.");
    }

    public void TakePhysicalDamage(int damageAmount)
    {
        health.Subtract(damageAmount);
        onTakeDamage?.Invoke();
    }


Campfire 오브젝트를 만들고 범위를 지정하여 닿았을 때, 데미지가 들어오도록 한다.


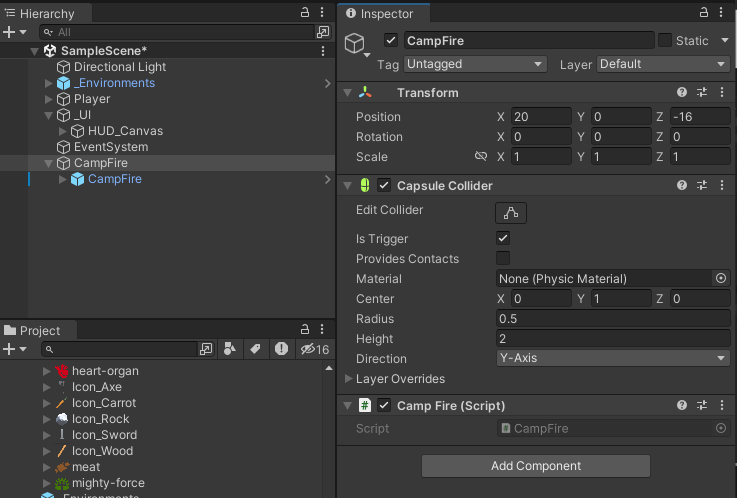
Update에서 델타 타임을 쌓아가며 지정한 시간보다 넘어가면 실행하거나 Coroutine으로 wait for second로 시간을 기다리는 코들르 사용하지 않고 InvokeRepeating로 지연 실행시킨다. 아래 코드에서는 List를 사용했는데 삽입, 삭제가 한 번에 일어나기 때문에 더 빠른 HashSet을 사용해도 된다.

public int damage;
    public float damageRate;

    private List<IDamagable> thingsToDamage = new List<IDamagable>();

    private void Start()
    {
        InvokeRepeating("DealDamage", 0, damageRate);
    }

    void DealDamage()
    {
        for(int i =0;i<thingsToDamage.Count;i++)
        {
            thingsToDamage[i].TakePhysicalDamage(damage);
        }
    }

    private void OnTriggerEnter(Collider other)
    {
        if(other.gameObject.TryGetComponent(out IDamagable damagable))
        {
            thingsToDamage.Add(damagable);
        }
    }

    private void OnTriggerExit(Collider other)
    {
        if (other.gameObject.TryGetComponent(out IDamagable damagable))
        {
            thingsToDamage.Remove(damagable);
        }
    }


데미지를 받았을 때, 아까 만들어둔 DamageIndicator이 켜지고 일정 시간 동안 감소되어 사라지는  스크립트를 추가한다.

public Image image;
    public float flashSpeed;

    private Coroutine coroutine;

    public void Flash()
    {
        if(coroutine != null)
        {
            StopCoroutine(coroutine);
        }

        image.enabled = true;
        image.color = Color.red;
        coroutine = StartCoroutine(FadeAway());
    }

    private IEnumerator FadeAway()
    {
        float startAlpha = 0.3f;
        float a = startAlpha;

        while(a > 0.0f)
        {
            a -= (startAlpha / flashSpeed) * Time.deltaTime;
            image.color = new Color(1.0f, 0.0f, 0.0f, a);
            yield return null;
        }

        image.enabled = false;
    }


플레이어가 데미지를 받았을 때, DamageIndicator가 실행하도록 한다.


그런데 안켜진다... image.enabled를 했기 때문에 오브젝트가 아니라 image 컴포넌트를 꺼야한다.

UI를 배치한 뒤, 해상도를 바꾸면 화질이 깨지고 UI가 잘릴 때가 있다.

Canvus에서 Canvas Scaler를 Scale With Screen Size로 바꿔준 뒤, 기준이 될 참조 해상도(Reference Resolution)를 정해준다.


Constant Pixel Size : UI 요소가 화면 크기에 상관없이 동일한 픽셀 크기로 유지된다.

Scale With Screen Size : 화면이 커질수록 UI 요소도 커진다.

Constant Physical Size : 화면 크기와 해상도에 상관없이 UI 요소가 동일한 물리적인 크기로 유지된다.


그리고 Canvus 안의 UI의 Anchor 기준을 각각 정해준다. Anchor로부터 UI의 각 모서리까지 거리 비율이 계산된다. 고정거리는 항상 유지되기 때문에 해상도에 따라 Anchor가 이동한다.


만약 앵커를 다음과 같이  양쪽에 박아두면 해당 Canvus의 크기는 양쪽으로 늘어나거나 줄어들 것이다. 즉, Anchor로부터 모서리까지의 거리는 고정거리이며, 그 외의 거리는 상대거리로 비율이 계산되는 것이다.

로직 구현

근거리 몹의 데미지를 구현하기 위해 Collider를 하나 더 달아서 Trigger로 만들어준다.


GameManager에 로직을 추가한다. 아래 IEnumerator StartNextWave()는 Coroutine(코루틴)이다. 코루틴은 비동기적으로 실행되는 함수로, 특정 부분에서 일시적으로 멈추거나 다시 시작하게 한다.

Start에서 코루틴을 실행하고 GameOver가 되면 멈춘다. 소환된 몹이 0이 되면(첫 시작이거나 다 잡았거나) Wave를 최신화 해준다.

[SerializeField] private int currentWaveIndex = 0;
private int currentSpawnCount = 0;
private int waveSpawnCount = 0;
private int waveSpawnPosCount = 0;

public float spawnInterval = .5f;
public List<GameObject> enemyPrefebs = new List<GameObject>();

[SerializeField] private Transform spawnPositionsRoot;    
private List<Transform> spawnPostions = new List<Transform>();

private void Awake()
{
	instance = this;
    Player = GameObject.FindGameObjectWithTag(playerTag).transform;

    playerHealthSystem = Player.GetComponent<HealthSystem>();
    playerHealthSystem.OnDamage += UpdateHealthUI;
    playerHealthSystem.OnHeal += UpdateHealthUI;
    playerHealthSystem.OnDeath += GameOver;

    gameOverUI.SetActive(false);

    for (int i = 0; i < spawnPositionsRoot.childCount; i++)
    {
        spawnPostions.Add(spawnPositionsRoot.GetChild(i));
    }
}

private void Start()
{
    UpgradeStatInit();
    StartCoroutine("StartNextWave");
}

// 코루틴
IEnumerator StartNextWave()
{
    while(true)
    {
        if(currentSpawnCount == 0)
        {
            UpdateWaveUI();
            yield return new WaitForSeconds(2f);

            if(currentWaveIndex % 20 == 0)
            {
                // 업그레이드
            }

            if(currentWaveIndex % 10 == 0)
            {
                waveSpawnPosCount = waveSpawnPosCount + 1 > spawnPostions.Count ? waveSpawnPosCount : waveSpawnPosCount + 1;
                waveSpawnCount = 0;
            }

            if(currentWaveIndex % 5 ==0)
            {
                // 보상
            }

            if(currentWaveIndex % 3 == 0)
            {
                waveSpawnCount += 1;
            }


            for(int i =  0; i < waveSpawnPosCount;i++)
            {
                int posIdx = Random.Range(0, spawnPostions.Count);
                for(int j = 0; j <waveSpawnCount;j++)
                {
                    int prefabIdx = Random.Range(0,enemyPrefebs.Count);
                    GameObject enemy = Instantiate(enemyPrefebs[prefabIdx], spawnPostions[posIdx].position, Quaternion.identity);
                    enemy.GetComponent<HealthSystem>().OnDeath += OnEnemyDeath;
      
                    currentSpawnCount++;
                    yield return new WaitForSeconds(spawnInterval);
                }
            }

            currentWaveIndex++;
        }

        yield return null;
    }
}

private void OnEnemyDeath()
{
    currentSpawnCount--;
}

private void GameOver()
{    
    gameOverUI.SetActive(true);
    StopAllCoroutines();
}

private void UpdateWaveUI()
{
    waveText.text = (currentWaveIndex + 1).ToString();
}


유니티로 돌아와서 적 스폰지점을 만들고 GameManager에 알려준다.


아이템 구현

아이템 구현을 위해 스크립트를 만든다. PickupItem 스크립트로 아이템을 생성하진 않을 것이기 때문에 추상 클래스로 만든다.

아이템을 먹었을 때 삭제할 것인지, 아이템을 먹을 수 있는 레이어, 오디오를 추가한다.

[SerializeField] private bool destroyOnPickup = true;
[SerializeField] private LayerMask canBePickupBy;
[SerializeField] private AudioClip pickupSound;

    private void OnTriggerEnter2D(Collider2D other)
    {
        if (canBePickupBy.value == (canBePickupBy.value | (1 << other.gameObject.layer)))
        {
            OnPickedUp(other.gameObject);
            if (pickupSound)
                SoundManager.PlayClip(pickupSound);

            if (destroyOnPickup)
            {
                Destroy(gameObject);
            }
        }
    }

    protected abstract void OnPickedUp(GameObject receiver);


실체를 구현하기 위해 상속 받는다.

아이템을 먹었을 때, 체력이 회복되거나 스텟이 올라가도록 한다.

public class PickupStatModifiers : PickupItem
{
    [SerializeField] private List<CharacterStats> statsModifier;
    protected override void OnPickedUp(GameObject receiver)
    {
        CharacterStatsHandler statsHandler = receiver.GetComponent<CharacterStatsHandler>();
        foreach (CharacterStats stat in statsModifier)
        {
            statsHandler.AddStatModifier(stat);
        }
    }
}
public class PickupHeal : PickupItem
{
    [SerializeField] int healValue = 10;
    private HealthSystem _healthSystem;

    protected override void OnPickedUp(GameObject receiver)
    {
        _healthSystem = receiver.GetComponent<HealthSystem>();
        _healthSystem.ChangeHealth(healValue);
    }
}


GameManager에 5번째마다 아이템이 나오도록 추가한다.

public List<GameObject> rewards = new List<GameObject>();

// 생략
if (currentWaveIndex % 5 == 0)
{
    CreateReward();
}

void CreateReward()
{
    int idx = Random.Range(0, rewards.Count);
    int posIdx = Random.Range(0, spawnPostions.Count);

    GameObject obj = rewards[idx];
    Instantiate(obj, spawnPostions[posIdx].position, Quaternion.identity);
}


'부트캠프 > Study' 카테고리의 다른 글

<Unity> 3D 게임 개발 심화 - RPG FSM(1)  (2) 2023.12.22
<Unity> UI  (0) 2023.12.14
<Unity> 숙련 - 2D 게임 개발(7)  (1) 2023.12.12
<Unity> 숙련 - 2D 게임 개발(6)  (1) 2023.12.12
ToString() 메서드  (1) 2023.12.11

파티클 생성

플레이어 하위에 Effects - Particle System을 생성한다.


적당히 꾸며준다.

  • Duration : 얼마나 실행할 것인가
  • Looping : 반복 실행
  • Start Lifetime : 생존 시간
  • Start Speed : 시작 속도
  • Start Size : 파티클 사이즈
  • Simulation Space : 어느 곳에서 애니메이션화할지(오브젝트, 월드, 커스텀 등)

Emission

  • Rate over Time : 시간 당 방출량

Shape

  • Shape : 방출 모양
  • Radius : 뿜어져 나오는 범위

Limit Velocity over Lifetime

  • Speed : 파티클 속도
  • - Dampen : 감소 속도, 저항

Color over Lifetime : 생존 동안의 색상 변화Size over Lifetime : 생존 동안의 크기 변화

Collision

  • Dampen : 감소 속도, 저항
  • Bounce : 탄성

Renderer

  • Material : 재질
  • Order in Layer : 레이어 순서


스크립트를 만들어 플레이어가 움직일 때마다 생성되도록 애니메이터가 있는 공간에 달아준다.

[SerializeField] private bool createDustOnWalk = true;
    [SerializeField] private ParticleSystem dustParticleSystem;

    public void CreateDustParticles()
    {
        if (createDustOnWalk)
        {
            dustParticleSystem.Stop();
            dustParticleSystem.Play();
        }
    }


동작할 때마다 파티클을 달아줄 애니메이션을 선택하여 Animation Event를 달아준다. 애니메이션 이벤트는 같이 설정되어있는 곳에 애니메이션이 있어야 호출할 수 있다.


투사체 소멸 효과도 만들어준다. 파티클을 만들어서 달아준 뒤, ProjectileManager에 스크립트를 추가한다.

투사체가 적이나 벽에 닿았을 때, 파티클이 터지는 코드인데 이 부분은 솔직히 이해 못해서 다시 봐야할 것 같다.

public void CreateImpactParticlesAtPostion(Vector3 position, RangedAttackData attackData)
{
    _impactParticleSystem.transform.position = position;
    ParticleSystem.EmissionModule em = _impactParticleSystem.emission;
    em.SetBurst(0, new ParticleSystem.Burst(0, Mathf.Ceil(attackData.size * 5)));
    ParticleSystem.MainModule mainModule = _impactParticleSystem.main;
    mainModule.startSpeedMultiplier = attackData.size * 10f;
    _impactParticleSystem.Play();
}


원거리 투사체 스크립트 부분도 수정한다.

private void DestroyProjectile(Vector3 position, bool createFx)
{
    if (createFx)
    {
        _projectileManager.CreateImpactParticlesAtPostion(position, _attackData);
    }
    gameObject.SetActive(false);
}


사운드 컨트롤

사운드 매니저 스크립트를 만든다.

싱글톤화 시킨 후, 사운드 이펙트에 맞춘 볼륨, 이펙트 볼륨, 배경음악 볼륨과 오브젝트 풀, 오디오소스와 실제로 오디오를 가지고 있는 오디오클립을 준비한다.

public static SoundManager instance;

    [SerializeField][Range(0f, 1f)] private float soundEffectVolume;
    [SerializeField][Range(0f, 1f)] private float soundEffectPitchVariance;
    [SerializeField][Range(0f, 1f)] private float musicVolume;
    private ObjectPool objectPool;

    private AudioSource musicAudioSource;
    public AudioClip musicClip;

    private void Awake()
    {
        instance = this;
        musicAudioSource = GetComponent<AudioSource>();
        musicAudioSource.volume = musicVolume;
        musicAudioSource.loop = true;

        objectPool = GetComponent<ObjectPool>();
    }

    private void Start()
    {
        ChangeBackGroundMusic(musicClip);
    }

    public static void ChangeBackGroundMusic(AudioClip music)
    {
        instance.musicAudioSource.Stop();
        instance.musicAudioSource.clip = music;
        instance.musicAudioSource.Play();
    }

    public static void PlayClip(AudioClip clip)
    {
        GameObject obj = instance.objectPool.SpawnFromPool("SoundSource");
        obj.SetActive(true);
        SoundSource soundSource = obj.GetComponent<SoundSource>();
        soundSource.Play(clip, instance.soundEffectVolume, instance.soundEffectPitchVariance);
    }


SoundSource는 사운드 클립을 컨트롤 하기 위해 만든 것이다. Play를 걸면 해당 클립을 설정한 볼륨과 피치로 재생시킨다. Invoke는 지연 실행으로, 노래가 끝난 2초 뒤에 끝낸다.

private AudioSource _audioSource;

    public void Play(AudioClip clip, float soundEffectVolume, float soundEffectPitchVariance)
    {
        if (_audioSource == null)
            _audioSource = GetComponent<AudioSource>();

        CancelInvoke();
        _audioSource.clip = clip;
        _audioSource.volume = soundEffectVolume;
        _audioSource.Play();
        _audioSource.pitch = 1f + Random.Range(-soundEffectPitchVariance, soundEffectPitchVariance);

        Invoke("Disable", clip.length + 2);
    }

    public void Disable()
    {
        _audioSource.Stop();
        gameObject.SetActive(false);
    }


유니티에서 SoundManager와 SoundSource를 만들어준 뒤, 각각 스크립트를 연결시킨다.

SoundSource에 Audio Source를 달아주고 프리팹화 시킨다. SoundManager 역시 Audio Source와 배경음악을 달아준다.


Shooting 소리나 데미지를 입었을 때 등 효과음을 넣어주기 위해 스크립트에 AudioClip을 부른 뒤, 해당 조건에 재생되도록 한다.

public AudioClip shootingClip;

----------------- 생략 ----------------- 
if (shootingClip)
        SoundManager.PlayClip(shootingClip);


UI

UGUI를 사용하여 UI를 구현하기 위해 Canvas를 생성하고 Scale을 Scale With Screen Size로 바꿔준 뒤, 16:9로 변경한다. Scale With Screen Size 화면이 커질수록 UI 요소도 커져서 멀티 해상도에 대응이 가능하다. 반대로 Constant Physical Size는 화면 크기와 해상도에 관계없이 UI 요소가 동일한 물리적인 크기로 유지된다.


UI 배치는 큰 묶음과 앵커에 신경쓰면 좋다.

앵커를 기준으로 크기와 좌표를 정한다.

현재 앵커가 중앙에 걸려있으므로 화면 사이즈가 변할 때, 중앙을 기준으로 위치가 유지된다.


Wave를 띄우기 위해 Canvas 하위에 빈 오브젝트를 생성해서 image를 추가하여 앵커로 위치를 조정한다.


생성한 캔버스를 꽉 채우기 위해서는 alt + 클릭으로 stretch를 선택하면 된다.


UI를 적당히 꾸며준 뒤, UI를 처리하는 스크립트를 GameManager에서 처리한다.

플레이어의 체력을 불러와서 %로 계산해준 뒤, Silder UI에 반영한다.

GameOver가 되면 GameOver UI가 실행되도록 하고, 버튼을 눌렀을 때 각각 게임 Scene화면을 다시 불러오고 어플리케이션을 종료시킨다. 예전에는 Application.LoadScene로 씬을 불러왔는데 이제는 사용되지 않기 때문에 SceneManager로 build Setting에 걸려있는 인덱스 번호로 불러온다.(Scene 이름으로 불러올 수도 있다.)

using TMPro;
using UnityEngine.SceneManagement;
using UnityEngine.UI;

private HealthSystem playerHealthSystem;

[SerializeField] private TextMeshProUGUI waveText;
[SerializeField] private Slider hpGaugeSlider;
[SerializeField] private GameObject gameOverUI;

private void Awake()
{
    instance = this;
    Player = GameObject.FindGameObjectWithTag(playerTag).transform;

    playerHealthSystem = Player.GetComponent<HealthSystem>();
    playerHealthSystem.OnDamage += UpdateHealthUI;
    playerHealthSystem.OnHeal += UpdateHealthUI;
    playerHealthSystem.OnDeath += GameOver;

    gameOverUI.SetActive(false);
}

private void UpdateHealthUI()
{
    hpGaugeSlider.value = playerHealthSystem.CurrentHealth / playerHealthSystem.MaxHealth;
}

private void GameOver()
{
    gameOverUI.SetActive(true);    
}

private void UpdateWaveUI()
{
    // waveText.text = 
}

public void RestartGame()
{
    SceneManager.LoadScene(SceneManager.GetActiveScene().buildIndex);
}

public void ExitGame()
{
    Application.Quit();
}


유니티로 돌아와서 GameManager와 버튼에 필요한 것들을 연결해준다.


'부트캠프 > Study' 카테고리의 다른 글

<Unity> UI  (0) 2023.12.14
<Unity> 숙련 - 2D 게임 개발(8)  (0) 2023.12.13
<Unity> 숙련 - 2D 게임 개발(6)  (1) 2023.12.12
ToString() 메서드  (1) 2023.12.11
<Unity> 숙련 - 2D 게임 개발(5)  (0) 2023.12.10

+ Recent posts